The end of an era… and the beginning of something new

Standard

Hello friends, how have you been?

It’s been almost a year since my last post (this feels like deja vu… I’m sure I’ve said that before after some very long absences.)

Anyway, I’m just back here briefly, one last time, to let you know that I’ve decided to bring Cute as a Button to an end.

When I started this little blog nearly five years ago (how on earth is it that long already?!) I had no idea that I would find blogging so much fun or that I would meet so many wonderful people! I simply wanted a place to record some of the things I made and had no idea that other people would actually want to join me on my crafty journey too. It amazes me that even though I haven’t posted anything new for so very long, there are still visitors stopping by to look at past posts. I would like to say a huge thank you to each and every one of you who has taken the trouble to visit, comment on posts, follow links and just spend time here.

When I started blogging I was working part time as a teacher and found plenty of time to craft and blog. When I switched to full time work, I found it much harder to get a good work/life balance and even though the crafting still went on in the background I didn’t really have the time or energy to share it with you all. Earlier this year I got to the point I was signed off work with stress. I decided at that point that I needed to get out of teaching, at least for a while, and left the school where I had been working for five years. It was really sad to say goodbye to the place where I had spent the majority of my teaching career, but it was totally the right decision.

I wasn’t working for a couple of months and during that time I started to dream. I’ve always wanted to have a little craft shop – in my mind it’s a light, spacious place, walls lined with shelves of wool and fabric, a huge table in the middle of the room for crafting groups, cosy armchairs with piles of magazines to browse through for inspiration… Sadly, I can’t actually afford a bricks and mortar shop, but I have decided to take the plunge and open up an online shop instead – eek!

But as I started to think about all sorts of shop related things, I grew more and more dissatisfied with the name Cute as a Button. I think it did the job just fine at the beginning, but I feel like I’ve outgrown it somewhat. It sounds a bit twee and I wanted something that was more unique. I spent a lot of time toying with different ideas until I finally came up with something I loved. And because you’ve made it this far through a very long post (thanks for sticking with it!) I want you to be the first to know my new name! Are you ready? I will now be known as…

gosling-and-plumb-logo_landscape-rgb

I have tentatively begun a new blog already. It’s in the very early stages, but if you want to pop over and have a look you can find me at goslingandplumb.co.uk. I’m still getting to grips with a slightly different way of blogging, so please bear with me while I work it all out. But I’d love to see you, so feel free to pop by any time! The shop isn’t in existence yet, but I’ll keep you posted on progress…

Before I leave, let’s have a little look back at some crafty goodness! I’ve loved sharing so many different projects with you all. Some of my favourites include:

  • Timmy and Tamara Turtle

Apr 2013 turtle tales

I loved making these little guys – almost as much as I enjoyed making up stories about them! You can read the beginning of their tale here.

May 20131 riverbed blanket

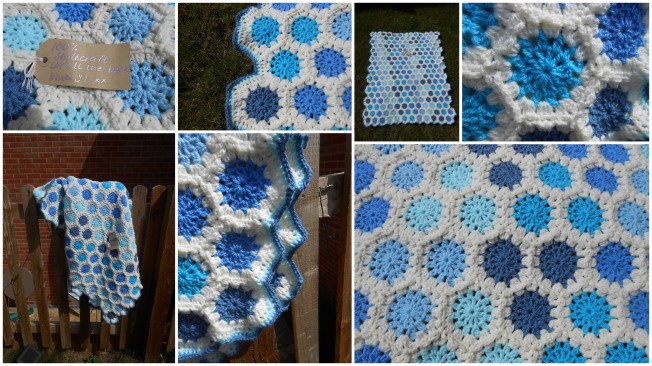
I made this for a friend’s birthday, and I love the fact that she still has it in her living room!

  • Paper cutting

I’ve not done this for a while now, but remember being really pleased with how these Easter/spring pictures turned out.

I still enjoy wearing mine and am looking forward to the colder weather so I can dig it out again!

  • A multitude of cushion covers

You can read about the cushion jumper here, the cable cushion here, the granny square cushion here, but unfortunately I can’t find the post about the recycled skirt cushion cover. It must be out there somewhere…

Which are your favourites?

So that’s about it. I’m slightly sad to be saying farewell to Cute as a Button, but so very excited about Gosling & Plumb! I really hope you’ll come with me on the next part of my journey, I’m sure we have a whole lot more fun in store.

By the way, I mentioned starting to knit a pair of socks in my very first post. I still haven’t finished them.

A cushion jumper

Standard

Hello friends, how have you been? Life here has been the normal mix of school, church and craft activities. I’ve transformed my living room from fresh spring…

image

…to cosy autumn.

image

I updated the twigs above my fireplace with sparkly apples, autumn leaves, felt apples and mushrooms and a couple of orange slices.

image

image

image

I also changed my cushion covers for cosy knitted/crochet covers in autumnal colours.

image

And this week I celebrated one year of (fairly) successful homeownership – hurrah!

I’ve just enjoyed a week off from school. My challenge was to finally unpack those last few boxes which had been lurking under beds/taking up space on my craft room floor! It took three days, multiple black bin bags and a trip to the charity shop, but I now feel that I’ve properly unpacked – hurrah!

image

This jumper very nearly ended up at the charity shop, but at the last minute I snatched it back from the bag. I’ve rarely worn it (it was way too big when I bought it but I couldn’t be bothered to take it back to the shop!) but I love the colours. And I realised that it would make a super cosy cushion cover, a perfect addition to my autumnal loving room!

image

I was a bit hesitant at first – my Mum and Granny always drilled it into me that you can’t go cutting knitted fabrics! – but I took the plunge and found it was actually easier than I expected. After I cut the pieces to the right size I whizzed it through the sewing machine (going over all the seams twice, just to make sure they hold), turned it the right way round then crocheted along one edge to make button holes to keep it closed.
Ta dah!

image

I’m really pleased with how it turned out and it only took about half an hour too! I’m now on the look out for other jumpers to cut up…

Half term challenge

Standard

Since going back to school after the Easter holidays I’ve been counting down the days until half term! However, despite the fact that I’ve been desperate for a holiday, I’ve made no plans at all for this week. So, in order to avoid just frittering my week away on Facebook, I’ve decided to set myself a challenge – I’m going to make (another) blanket.

I’ve been drooling over several gorgeous patterns on Pinterest and have decided to have a go at making a blanket using these blocks…
image

The first five rounds are the Willow block from Jan Eaton’s 200 Crochet Blocks book (a birthday present from my parents).
image

I then experimented with the outer rounds (in grey) – the one on the top is a slight adaptation of this pattern found over at Annie’s Place. It was actually her solid willow block blanket that inspired me in the first place. The one on the bottom follows the rest of the original Willow pattern. After some dithering I decided to go with the more solid block, although I really like the other one too.

I think this may be a slightly ambitious project for just a week, but it’s always good to try to do impossible things!! And after all, I have already completed the middles of eight blocks – how hard can this be?!
image

And yes, I know I could finish one of the five unfinished blankets I’ve got lying around the house, but that would be the sensible, grown up thing to do, and therefore sounds like no fun at all!

I’ll keep you updated on the progress. And pop over to my Facebook page for more pics. Have a lovely week!

Springy Eastery Garland

Standard

Some of you may remember seeing this photo on Facebook a couple of weeks ago.

"The creativity continues :)"

I was having a particularly creative Saturday (it was the day I made my peg bag out of shorts) and decided to spruce up some sticks I’d bought from Ikea. I’d bought them because I could imagine them hanging over my fireplace, all covered in pretty springy decorations, but up to that point they were just sticks with a few flowery fairy lights!

So I grabbed some plastic eggs (really cheap from the supermarket), a jar of paper flowers and a jar of buttons and this is what happened…

plastic eggs1

I loved the colours of the eggs, but not how plasticky they looked. The paper flowers disguise plastickiness nicely! And I love the bright, spring colours too. I hadn’t really planned them to all look so coordinated – it was only once I’d finished that I realised I’d chosen really similar colours for each flower.

In addition to the eggs, I also cut up some fake flowers to add to the flowery fairy lights (the big white flowers in the photos below). I’m not usually a fan of fake flowers, but I’d bought these to go in my basket when I was Red Riding Hood (it was a dress up day at school – I don’t usually dress up as fairy tale characters!) and it seemed a shame to let them just gather dust somewhere. I really like the different pinky colours too.

DSCN2842 DSCN2838 DSCN2837

As I was unpacking boxes I came across a couple of other decorations. I think this tin egg was a gift from a child at one of my placement schools when I was training to be a teacher.

DSCN2806

And I made this heart several years ago when I was experimenting with sewing fabric and paper. I really like it, but think it must have been a bit of a pain to make since this is the only one I have!

DSCN2801

I finished off the garland with a few tin heart bells that I found in a lovely local shop. I love their colours and the soft jingles they made as I hung them up.

tin hearts1

Here’s the finished product, complemented nicely by the bunting which used to hang on my bookcase.

DSCN2808 DSCN2798

So things are complete – for the time being! I love the fresh feel of all the combined items together, but at some point (probably soon after Easter) I’ll take the eggs off and replace them with other things. Not sure yet what I’ll replace them with though – any suggestions?

Easter Bonnets

Standard

I’m sure schools all over the world are taking part in Easter bonnet parades this week. In our school the children in KS1 make bonnets or hats and children in KS2 make a model. Some of the children (and their parents!) get very creative! We then walk the whole school around the village with the children wearing their hats or carrying their models. Lots of people from the village come out to see what the children have made and there’s a lovely festive atmosphere. These are some of the fantastic hats and models that children in my class made for the occastion.

DSCN2776 DSCN2778 DSCN2779 DSCN2782 DSCN2783 DSCN2785 DSCN2787 DSCN2791 DSCN2793 DSCN2795

All this springy/Eastery creativity has made me want to go to Hobbycraft and buy all sorts of lovely supplies to make my own Easter bonnet!

Peg bag

Standard

A couple of weeks ago a friend of mine smashed a hole in my concrete garden and put up my washing line. I got all excited about being able to hang my washing outside again – then realised that I had no pegs! I hurried out to buy some and greatly enjoyed hanging my washing out in the sunshine. However, my beg bag looked like this:

DSCN2707

Not pretty! I woke up this morning wanting to make something and, with several piles of washing to get through, a peg bag seemed like the perfect Saturday morning project.

I had a little look on Pinterest and found a pattern for this bag:

photo of a peg bag

I was going to adapt it slightly by adding a long strap and had some fabric in mind. But as I was rummaging for said fabric, I came across a pair of pink shorts.

DSCN2715

I’d bought them in a sale several years ago because I liked the fabric!

DSCN2719

I think they were super cheap (probably about £1) and have been stuffed away in my fabric box ever since. But they suddenly seemed the perfect thing for a peg bag!

I started by cutting the bottom off to make it straight.

DSCN2724

I also cut a section out of the back because they were a bit too wide.

DSCN2725

Then I got out Granny’s old sewing machine to stitch the edges. And this is where the process became a whole lot slower! I’ve not used the machine for a long time (in fact, the last time was probably when I was a teenager and Granny was sitting next to me explaining what I needed to do) and although I have the original manual, the language is slightly old fashioned and it takes a while to work out what it all means.

DSCN2730

Eventually I managed to wind thread on to the bobbin, attach it correctly (it took a few tries!) and get the thread ready for stitching. It coped surprising well on even the thickest parts of the fabric, but I found that the thread kept breaking – so frustrating. It ended up looking pretty messy! If I was giving this to someone else I’d probably have lined it to hide the mess – but since it’s only for me I decided not to bother. Anyway, I adjusted the tension and, even though I made it worse to start with, I managed to get it right in the end.

DSCN2739

I trimmed the bit I’d cut off so I could use it as a strap. I also cut some plain fabric to back it, then stitched both sides together before turning it the right way round.

DSCN2746

I hand stitched the strap in place. At this point Maisie decided to ‘help’ me. It’s actually really hard to sew with a cat in the way – she kept twitching and trying to catch the thread.

DSCN2752

Anyway, when the strap was attached I filled it with pegs and put it to use straight away.

DSCN2758

DSCN2762

It’s a slightly different pink to the other things on the back of the kitchen door, but I figure the more pinks I can get in my kitchen, the better!

DSCN2763

Craft room

Standard

One of the best things about my new house is that I get to have a craft room! It started off as a bit of a dumping ground…

DSCN2271

…but the cat loved exploring the boxes and found some great hiding places.

DSCN2272

I’ve had some time to do a bit of sorting and tidying, and even though it isn’t completely how I want it, it’s definitely useable! I have quite a lot of storage space on my two shelf units, and I love having all my pretty, colourful things on display and easily accessible.

DSCN2602

DSCN2607

I’ve added two of my drawer units to a shelf. They fit perfectly and don’t take up any desk space – bonus!

DSCN2608

I have Granny’s old sewing machine…

DSCN2572

…and pretty plates holding Useful Things.

DSCN2570

This is the ‘I’ll-get-round-to-sorting-it-out-one-day’ area! Not great to look at, but stuff is out of the way but easy to get to when I need it.

DSCN2604

I even have somewhere for the cat to sleep in the sun…

DSCN2579

…although she sometimes prefers to just sit next to her cushion and look out of the window.

DSCN2574

And my favourite part of the room – my colourful wall! I love all the different bits and pieces on this wall, some useful, some holding great memories, some just decorative. This wall is a work in progress – I plan to add more things to the spaces around the edges, and will probably take down/put up different things at various points.

DSCN2580

This bright, colourful space really makes me happy!

Spring decor

Standard

I had lots of fun decorating my house for Christmas. As well as all the usual decorations I also added red cushions and a super thick red rug to the lounge which made the room feel even more cosy and Christmassy.

DSCN2474

But with Christmas over and the decorations packed up and back in their boxes for another year, I decided it was time to get rid of the red.

DSCN2470 DSCN2471

Red is a great colour, and I particularly love it at Christmas time, but it’s not how I want my front room to look all year round.

DSCN2475

Pastels are my most favourite colours, and they just shout ‘Spring’! Now, it’s not really spring yet. Although we’ve had some wonderfully sunny days it’s still very cold. But it feels like winter needs to be given a bit of a push to make way for spring, so out come the pastels!

DSCN2591

It didn’t take much effort – I simply swapped cushion covers, putting away the red ones until next winter. Some of the cushion covers didn’t need to be changed because they work with both colour schemes.

DSCN2589

I like having blankets around no matter what time of year, so I just put away the red ones and brought out the pretty pastels again.

DSCN2588

When I first moved in I had the pink rug on the floor, which I’d put away for Christmas. But it’s back from under the wardrobe, looking slightly grubby (I think I’ll need to wash it, but only when the weather’s a bit warmer so I can dry it outside!) but very spring-ish.

DSCN2595

The look is completed (for now – I’m sure I’ll be adding more Easter related decorations soon!) with my colourful bunting and some flower fairy lights…

DSCN2598

…some pastel candles…DSCN2488

…and of course some beautiful flowers in colourful vases.

DSCN2567

DSCN2565

Lovely!

Recovering chairs

Standard

When I moved into my house I ended up with 5 mismatched dining chairs. I don’t really mind the mismatched look, but some of the chairs had definitely seen better days! They were grubby and one was slightly torn. Here they are in their original state…

DSCN2519

I decided that fresh fabric would do them the world of good. I bought this lovely spotty  fabric (I was tempted by some stripes, but decided it would probably end up looking wonky!) and was ready to get started.

DSCN2522

I started with the chair that Mum covered a few years ago. I took off the cream fabric and used it as a template for the first cover.

DSCN2524

DSCN2525

After ironing it (using lots of spray starch to get rid of all the creases) I began stapling it in place, making sure that I pulled it tight on each side.

DSCN2528

The end result was pretty scruffy on the bottom…

DSCN2531

…but I was really pleased with the top.

DSCN2536

And it looked even better actually on the chair!

DSCN2537

I’m sure this isn’t the most professional way to add new fabric to a chair seat, but it’s quick and easy! I timed the last one and it only took me 15 minutes from taking the seat off the chair to putting back on again. That included cutting and ironing the fabric and beating the dust out of the seat!

Here are the finished chairs, still mismatched but looking a whole lot better than before.

DSCN2547

My ‘new’ chairs make me smile every time I walk through the room!

DSCN2549

Growing granny blanket

Standard

More than a year ago I came across a blanket my auntie had made for my cousin.

DSCN7644

It was made of knitted squares and backed with fleece.

DSCN7650

It was pretty weighty and hugely cosy. It’s kinda stayed in my mind since and I loved the idea of making a crochet version. In fact, I even had plans to turn a CAL blanket into something similar.

But the CAL blanket it still unfinished (along with so many other things!) and I obviously forgot about my original plans. But the idea for a chunky blanket stuck with me. So back in May last year I ordered some Stylecraft Chunky. As soon as it arrived I crocheted a very long chain and got to work on my granny stripe blanket. (I followed Lucy’s Granny Stripe tutorial to make sure that I didn’t end up with wonky edges!)

DSCN2435

Well, it got off to a good start and I fairly rapidly made my way through 3 or 4 balls of wool. But then I did my usual thing of putting it down and leaving it – for about 7 months!

DSCN2431

I only found it again as I was packing to move. Last weekend I went away with some friends and wanted something easy to take with me, something I could work on and still be sociable. The blanket seemed like the perfect option.

DSCN2425

So I ordered some more wool (I hadn’t ordered nearly enough the first time!) and have more than doubled the amount of rows in the last week.

DSCN2424

It’s going to take a while to finish. Each row takes about 15 minutes, so it’s not a quick project! But I’m hoping that my current momentum will last a while…

DSCN2429

…although I can sense the momentum will slow when I get to darning in the ends!

I’ll keep you updated 🙂